GTCS Game Engine:
Tutorial 3: Sprites, Animation & Collision Detection
Tutorial 2 <-- Tutorial 3 --> Tutorial 4
Main tutorial guide page
Introduction
In this tutorial, we are going to look at another renderable type that implements animation of the image. We will also expand our understanding of game object behavior by using collision detection to determine when GameObjects overlap.
Covered Topics: Sprites • Animation • Collision Detection
Demonstrations: Using a Spritesheet • Animated Sprites • Detecting Collisions
Complete source code for all tutorials can be downloaded from here.
Sprites
TextureRenderables have a big advantage over Renderables in that they are able to render a bitmap. However, they do have a few significant limitations. Our texture must have dimensions that are powers of 2 and they are static. While this may work fine for backgrounds or static visual elements, we typically want something more dynamic the enhance the "action" of the graphics in our game. A SpriteRenderable allows us to use a spritesheet and define the portion of the sheet we want to display for the renderable.

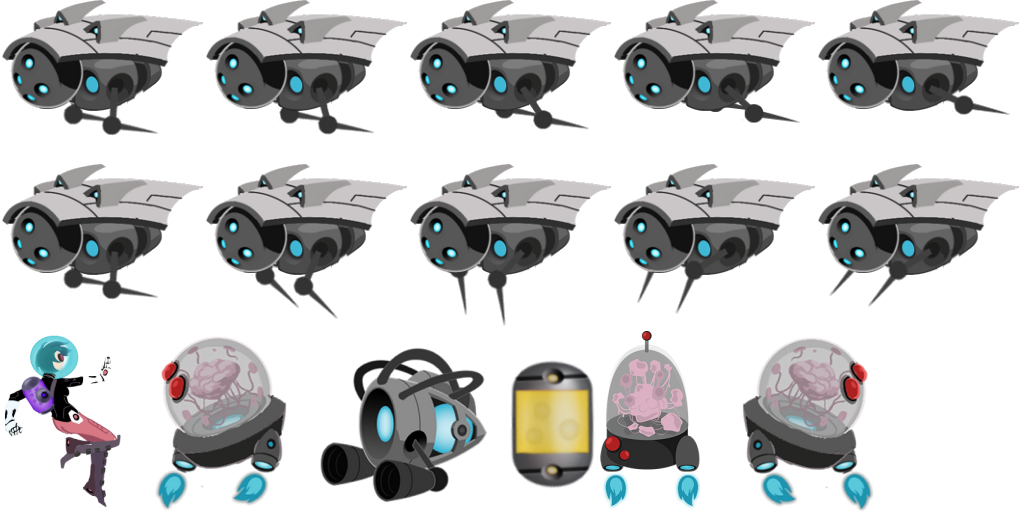
With this, we can store many if not all of our graphics in a single resource. In figure 3-1, we see a sample spritesheet. You will notice that the top row has variations of the same image and in the bottom row (second from the left), we have the same image we used in tutorial 2 and a reverse facing copy in the far right. We can use these types of images to simulate motion and infer direction. Figure 3-2 provides more details about our spritesheet.

With coordinate location (0,0) being the bottom left of the entire sprite page, the bottom left coordinate of our texture from tutorial 2 is at (130,0). The size of this sub-image is 180 pixels wide by 180 pixels tall. Using the call setElementPixelPositions(left-x, right-x, lower-y, upper-y); we can define the specific portion of the sheet we want to render without worrying about the dimensions being powers of 2.
function MyGameScene() {
	this.mCamera = null;
	this.mRenderable = null;
	this.mGameObject = null;

	this.kTexture = "assets/minion_spritesheet.png"
};
gEngine.Core.inheritPrototype(MyGameScene, Scene);

MyGameScene.prototype.loadScene = function () {
	gEngine.Textures.loadTexture(this.kTexture);
};

MyGameScene.prototype.unloadScene = function () {
	gEngine.Textures.unloadTexture(this.kTexture);
};

MyGameScene.prototype.initialize = function () {
	this.mCamera = new Camera(
		vec2.fromValues(50, 40),    // position of the camera
		100,                        // width of camera
		[0, 0, 500, 400]            // viewport (orgX, orgY, width, height)
	);
	// set the background color of our view to medium grey
	this.mCamera.setBackgroundColor([0.8, 0.8, 0.8, 1]);

	// we now use a sprite renderable object
	this.mRenderable = new SpriteRenderable(this.kTexture);
	this.mRenderable.setElementPixelPositions(130, 310, 0, 180);

	// create a new game object with the new renderable
	this.mGameObject = new GameObject(this.mRenderable);
	this.mGameObject.getXform().setSize(16, 16);
	this.mGameObject.getXform().setPosition(30, 50);

	gEngine.DefaultResources.setGlobalAmbientIntensity(3);
};
If you make the above changes to your code, you will notice that the scene looks exactly the same. So far, this doesn't seem very useful until we consider that we can consolidate all of our textures onto a single spritesheet and that our renderable textures can be of arbitrary dimensions.
Unlike a TextureRenderable, SpriteRenderable allows us to change the renderable being shown by changing the element pixel position of the spritesheet. There is an identical minion facing the opposite direction at (720,0). The size is still 180x180 so calling this.mRenderable.setElementPixelPositions(720, 900, 0, 180); will allow our sprite to appear to change direction.
Our draw() function is going to be identical to our previous samples.
MyGameScene.prototype.draw = function () {
	// Clear the screen
	gEngine.Core.clearCanvas([0.8, 0.8, 0.8, 1.0]);

	// Activate our camera
	this.mCamera.setupViewProjection();

	// Draw our objects
	this.mGameObject.draw(this.mCamera);
};
Below, we modify our update() function to make the sprite change directions based on the keyboard controls.
MyGameScene.prototype.update = function () {
	// Check for user keyboard input to control GameObject
	if (gEngine.Input.isKeyPressed(gEngine.Input.keys.A)) {
		this.mRenderable.setElementPixelPositions(130, 310, 0, 180);
		this.mGameObject.getXform().incXPosBy(-0.5);
	}

	if (gEngine.Input.isKeyPressed(gEngine.Input.keys.D)) {
		this.mRenderable.setElementPixelPositions(720, 900, 0, 180);
		this.mGameObject.getXform().incXPosBy(0.5);
	}

	if (gEngine.Input.isKeyClicked(gEngine.Input.keys.Q)) {
		gEngine.GameLoop.stop();
	}
};
You can see the scene here.
Sprite Animation
We can take our SpriteRenderable concept another step forward by defining how to implement automatic animation. First, we create a variables for a second renderable and game object.
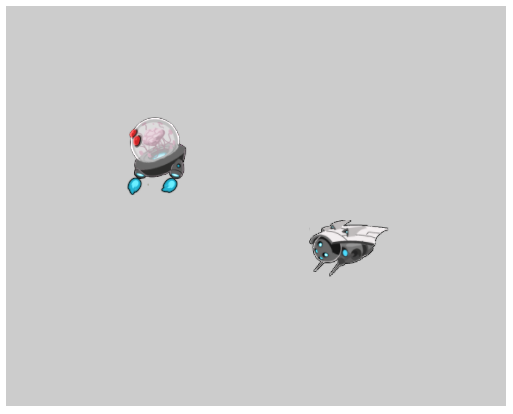
In our next example, we are going to setup two renderables. Our original renderable will still respond to keyboard input and our second renderable will follow the mouse location. The second renderable will also animate with a sprite sequence. You can see the results here.

First, we declare constants and load our resources.
function MyGameScene() {
	this.mCamera = null;
	this.mRenderable = null;
	this.mGameObject = null;
	this.mAnimatedRenderable = null;
	this.mAnimatedGameObject = null;

	this.kTexture = "assets/minion_spritesheet.png"
};
During initialization, we will use a new renderable object type, SpriteAnimateRenderable. This provides the function setSpriteSequence(348, 0, 204, 164, 5, 0) to define an animation sequence. Each of the parameters are defined as follows...
- 384 - Top Y-coordinate of image (164 pixels down from 512)
- 0 - Left X-Coordinate of image
- 204 - Width in pixels
- 164 - Height in pixels
- 5 - Number of elements in this sequence
- 0 - Horizontal padding in between
After creating renderable, we define what direction the engine should cycle through the images with setAnimationType(SpriteAnimateRenderable.eAnimationType.eAnimateRight) and how fast the cycle should move with setAnimationSpeed(50). As previously mentioned, the engine calls update and draw 60 times per second. These calls will cycle through 5 images every 50 calls. To have the sequence cycle every second, we make the call with a value of 60.
MyGameScene.prototype.initialize = function () {
	this.mCamera = new Camera(
		vec2.fromValues(50, 40),    // position of the camera
		100,                        // width of camera
		[0, 0, 500, 400]            // viewport (orgX, orgY, width, height)
	);
	// set the background color of our view to medium grey
	this.mCamera.setBackgroundColor([0.8, 0.8, 0.8, 1]);

	// we now use a sprite renderable object
	this.mRenderable = new SpriteRenderable(this.kTexture);
	this.mRenderable.setElementPixelPositions(130, 310, 0, 180);

	// create a new game object with the new renderable
	this.mGameObject = new GameObject(this.mRenderable);
	this.mGameObject.getXform().setSize(16, 16);
	this.mGameObject.getXform().setPosition(30, 50);

	// we create a second renderable
	this.mAnimatedRenderable = new SpriteAnimateRenderable(this.kTexture);
	this.mAnimatedRenderable.setSpriteSequence(348, 0, 204, 164, 5,	0);
	this.mAnimatedRenderable.setAnimationType(
    				SpriteAnimateRenderable.eAnimationType.eAnimateRight);
	this.mAnimatedRenderable.setAnimationSpeed(50);

	this.mAnimatedGameObject = new GameObject(this.mAnimatedRenderable);
	this.mAnimatedGameObject.getXform().setSize(16, 12.8);
	this.mAnimatedGameObject.getXform().setPosition(80, 50);

	gEngine.DefaultResources.setGlobalAmbientIntensity(3);
}; In the update function, we are going to control the motion of the second renderable using the mouse location. The engine's input routines can be used to get the mouse location but the coordinates will be in pixel space. To convert to WC, we need to take information from the camera object and perform math. Fortunately, this is very common so the camera object provides mouseWCX() and mouseWCY() to get the location in the proper coordinate system.
We also need to tell the renderable to update the animation with a call to updateAnimation().
MyGameScene.prototype.update = function () {
	this.mCamera.update();

	if (gEngine.Input.isKeyPressed(gEngine.Input.keys.A)) {
		this.mRenderable.setElementPixelPositions(130, 310, 0, 180);
		this.mGameObject.getXform().incXPosBy(-0.5);
	}

	if (gEngine.Input.isKeyPressed(gEngine.Input.keys.D)) {
		this.mRenderable.setElementPixelPositions(720, 900, 0, 180);
		this.mGameObject.getXform().incXPosBy(0.5);
	}

	// set the location for this GameObject to the current mouse position
	this.mAnimatedGameObject.getXform().setXPos(this.mCamera.mouseWCX());
	this.mAnimatedGameObject.getXform().setYPos(this.mCamera.mouseWCY());

	if (gEngine.Input.isKeyClicked(gEngine.Input.keys.Q)) {
		gEngine.GameLoop.stop();
	}

    this.mGameObject.update();
    this.mAnimatedRenderable.updateAnimation();
};
In the draw routine, of course, we draw our second renderable.
MyGameScene.prototype.draw = function () {
	// Clear the screen
	gEngine.Core.clearCanvas([0.8, 0.8, 0.8, 1.0]);

	// Activate our camera
	this.mCamera.setupViewProjection();

	// Draw our objects
	this.mGameObject.draw(this.mCamera);
	this.mAnimatedGameObject.draw(this.mCamera);
};
As long as the mouse is within the canvas area and the browser is in the foreground, the canvas will draw the the second GameObject at the mouse location.
Collision Detection
The code we have created in this tutorial has set us up for looking at collision detection (after all, we need at least two objects to touch to see this in action). We call GameObject's pixelTouches() function to determine if the game object is in contact with another game object. The function returns a boolean and provides the WC coordinates of the point where the collision occurred.
MyGameScene.prototype.update = function () {
	this.mCamera.update();

	if (gEngine.Input.isKeyPressed(gEngine.Input.keys.A)) {
		this.mRenderable.setElementPixelPositions(130, 310, 0, 180);
		this.mGameObject.getXform().incXPosBy(-0.5);
	}

	if (gEngine.Input.isKeyPressed(gEngine.Input.keys.D)) {
		this.mRenderable.setElementPixelPositions(720, 900, 0, 180);
		this.mGameObject.getXform().incXPosBy(0.5);
	}

	this.mAnimatedGameObject.getXform().setXPos(this.mCamera.mouseWCX());
	this.mAnimatedGameObject.getXform().setYPos(this.mCamera.mouseWCY());

	if (gEngine.Input.isKeyClicked(gEngine.Input.keys.Q)) {
		gEngine.GameLoop.stop();
	}

	// we declare an array to store the point of intersection (not used by us)
	var h = [];
	if (this.mAnimatedGameObject.pixelTouches(this.mGameObject,h)) {
		this.mAnimatedRenderable.getXform().incRotationByDegree(2);
	}

    this.mGameObject.update();
    this.mAnimatedRenderable.updateAnimation();
};
As we can see here, we check to see if there is overlap between the two GameObjects and cause rotation of the animated renderable when overlapping. Notice that our renderable continues to animate while it is rotating.
Conclusion
With the spritesheet and SpriteAnimateRenderable, there is a great deal of potential in customizing the look of our game elements. Collision detection gives us a tool for working with behavior.
In tutorial 4, we will take a further look at behavior using rigid bodies to resolve GameObject overlap after collisions. This will simulate GameObjects acting as solid objects when interacting with eachother. We will also look at creating particle affects.
Tutorial 2 <-- Tutorial 3 --> Tutorial 4
Main tutorial guide page