GTCS Game Engine:
Tutorial 6: Shadows and Parallax
Tutorial 5 <-- Tutorial 6
Main tutorial guide page
Introduction
In this tutorial, we are going to continue our understanding of lighting by working with shadow affects. To add more depth to our environment, we are going to also look at layering with parallax effects and end with parallax using camera panning.
Covered Topics: Shadows • Parallax • Panning & Parallax
Demonstrations: Casting Shadows• Parallax Effect • Camera Panning
Complete source code for all tutorials can be downloaded from here.
Shadows
Much like lighting, in order for shadow to be rendered, we have to register each renderable to actively draw shadows. A renderable can be a shadow caster, a shadow receiver or both. We can use a LightRenderable or an IllumRenderable object as a source of shadow. To do this, we will need to use a ShadowReceiver object. The ShadowReceiver encapsulates a GameObject to provide shadow functionality. We then use this object for drawing.
The general process is as follows...
- We create LightRenderable or IllumRenderable objects for the caster and receiver. But also define a Z position for the caster to indicate a depth offset. This value is used to calculate shadows. As usual, we encapsulate the Renderable into GameObjects.
- We create our light source making sure to activate the calculation of shadows with the source using the
setLightCastShadowTo()function. We apply the light source to the caster and receiver renderables. - We initialize a new ShadowReceiver object with the receiver's GameObject.
- For every GameObject that we wish to be able to cast shadows onto the receiver, we call the receiver's
addShadowCaster()function with a references to the caster GameObject. - During the draw phase, we draw with the ShadowReceiver object. It will calculate all shadows for its renderable during drawing. We need to make sure that we draw the ShadowReceivers before other GameObjects.
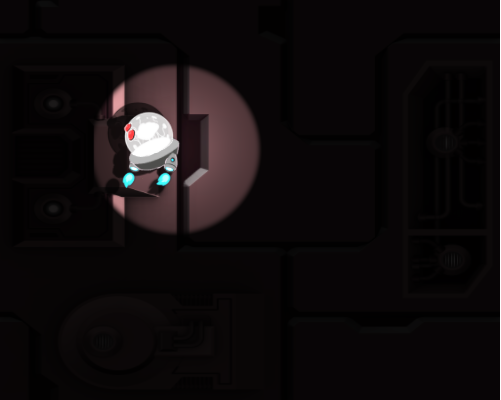
We can view our next example here. The WASD keys control the position of the point light. Though we do not define direction for a point light, the light is emanating from a single point 10 units up the Z-axis. The virtual radial "light rays" provide direction that causes the shadow to move opposing the light source.
Declare variables and load resources.
function MyGameScene() {
	this.mCamera = null;
	this.mRenderable = null;
	this.mBgObject = null;
	this.mGameObject = null;
	this.mLight = null;
	this.mShadow = null;

	this.kBG = "assets/bg.png";
	this.kBGNormal = "assets/bg_normal.png";
	this.kTexture = "assets/minion_sprite.png"
};
gEngine.Core.inheritPrototype(MyGameScene, Scene);

MyGameScene.prototype.loadScene = function () {
	gEngine.Textures.loadTexture(this.kBG);
	gEngine.Textures.loadTexture(this.kBGNormal);
	gEngine.Textures.loadTexture(this.kTexture);
};

MyGameScene.prototype.unloadScene = function () {
	gEngine.Textures.unloadTexture(this.kBG);
	gEngine.Textures.unloadTexture(this.kBGNormal);
	gEngine.Textures.unloadTexture(this.kTexture);
};
In the initialization function, we create a background renderable. We use an IllumRenderable as we have a normal map for this background. It is going to be encapsulated in a GameObject for shadows so we have it as a local variable.
We create our light source as normal making sure to enable the calculation of shadows.
MyGameScene.prototype.initialize = function () {
	this.mCamera = new Camera(
		vec2.fromValues(50, 40),	// position of the camera
		100,						// width of camera
		[0, 0, 500, 400]			// viewport (orgX, orgY, width, height)
	);
	this.mCamera.setBackgroundColor([0.8, 0.8, 0.8, 1]);

	// create a background for the scene and put it into a GameObject
	var background;
	background = new IllumRenderable(this.kBG, this.kBGNormal);
	background.getXform().setSize(100, 80);
	background.getXform().setPosition(50, 40);
	this.mBgObject = new GameObject(background);

	// we use an object type that knows how to render with lights
	this.mRenderable = new LightRenderable(this.kTexture);
	this.mRenderable.setElementPixelPositions(130, 310, 0, 180);

	// create the light and setup the parameters we need
	this.mLight = new Light();
	this.mLight.setLightType(Light.eLightType.ePointLight);
	this.mLight.setColor([1.0, 1.0, 1.0, 1]);
	this.mLight.setXPos(35);
	this.mLight.setYPos(50);
	this.mLight.setZPos(10);
	this.mLight.setNear(18);
	this.mLight.setFar(20);
	this.mLight.setIntensity(2);

	// make sure to set this to true
	this.mLight.setLightCastShadowTo(true);

	// ... Continued in next snippet ...
Code snippet 6-2: Creating Background and Light Source
Next, we add the light source to the renderables. We make sure to apply a Z position to the GameObject that will be casting a shadow. Then we create the ShadowReceiver object sending in the background GameObject. We call addShadowCaster() with the caster's GameObject.
	// associate the light with the renderables
	background.addLight(this.mLight);
	this.mRenderable.addLight(this.mLight);

	// create a new game object with the new renderable
	this.mGameObject = new GameObject(this.mRenderable);
	this.mGameObject.getXform().setSize(16, 16);
	this.mGameObject.getXform().setPosition(30, 50);

	// provide a Z coordinate for the GameObject
	this.mGameObject.getXform().setZPos(3);

	this.mShadow = new ShadowReceiver(this.mBgObject);
	this.mShadow.addShadowCaster(this.mGameObject);

	// we set the ambient light low to emphasize light affect
	gEngine.DefaultResources.setGlobalAmbientIntensity(0.4);
};
Our draw and update functions are the same as previous examples except, for those GameObjects that must render shadows, we draw using the ShadowReceiver objects.
// This is the draw function, make sure to setup proper drawing environment, and more
// importantly, make sure to _NOT_ change any state.
MyGameScene.prototype.draw = function () {
	// Clear the screen
	gEngine.Core.clearCanvas([0.8, 0.8, 0.8, 1.0]);

	// Activate our camera
	this.mCamera.setupViewProjection();

	// Draw our objects
	this.mShadow.draw(this.mCamera);
	this.mGameObject.draw(this.mCamera);
};

// The Update function, updates the application state. Make sure to _NOT_ draw
// anything from this function!
MyGameScene.prototype.update = function () {
	if (gEngine.Input.isKeyPressed(gEngine.Input.keys.A)) {
		var x = this.mLight.getPosition()[0];
		this.mLight.setXPos(x - 0.5);
	}

	if (gEngine.Input.isKeyPressed(gEngine.Input.keys.D)) {
		var x = this.mLight.getPosition()[0];
		this.mLight.setXPos(x + 0.5);
	}
	if (gEngine.Input.isKeyPressed(gEngine.Input.keys.W)) {
		var y = this.mLight.getPosition()[1];
		this.mLight.setYPos(y + 0.5);
	}

	if (gEngine.Input.isKeyPressed(gEngine.Input.keys.S)) {
		var y = this.mLight.getPosition()[1];
		this.mLight.setYPos(y - 0.5);
	}
};
Parallax
Parallax is an animation technique used to create an illusion of depth in a 2D environment. This is particularly common in side-scrolling games and is accomplished by making objects in the background scroll at a slower speed than objects in the foreground. For example, you might have cloud in the sky "in the distance" move very slowly while your characters move very quickly.
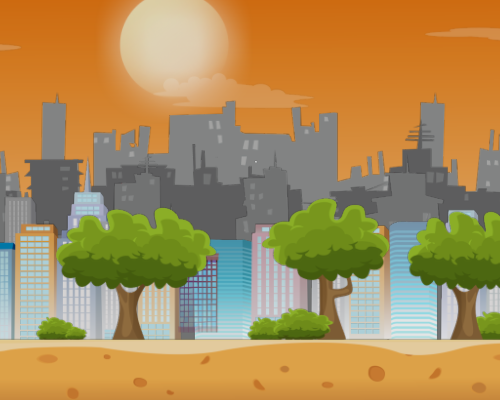
In our next example, we implement parallax as shown here. This image is created with eight layers. We will create a LightRenderable for each layer and encapsulate in a ParallaxGameObject. We set the layer number motion direction and speed. If the speed were set the same for all layers, the parallax object will automatically adjust the speed based on the layer. We update the objects and draw in order from farthest to nearest.
The images composing the layers will be automatically tiled making it appear to be ongoing (if you watch the example long enough, the sun will disappear off the left edge of the screen and eventually reappear on the right).
First we declare all variables and constants. We load the resources.
function MyGameScene() {
	this.mCamera = null;

	this.mBgL1 = null;
	this.mBgL2 = null;
	this.mBgL3 = null;
	this.mBgL4 = null;
	this.mBgL5 = null;
	this.mBgL6 = null;
	this.mBgL7 = null;
	this.mBgL8 = null;

	// graphics created by Mobile Game Graphics
	this.kLayer1 = "assets/layer_01.png";
	this.kLayer2 = "assets/layer_02.png";
	this.kLayer3 = "assets/layer_03.png";
	this.kLayer4 = "assets/layer_04.png";
	this.kLayer5 = "assets/layer_05.png";
	this.kLayer6 = "assets/layer_06.png";
	this.kLayer7 = "assets/layer_07.png";
	this.kLayer8 = "assets/layer_08.png";
}
gEngine.Core.inheritPrototype(MyGameScene, Scene);

MyGameScene.prototype.loadScene = function () {
	gEngine.Textures.loadTexture(this.kLayer1);
	gEngine.Textures.loadTexture(this.kLayer2);
	gEngine.Textures.loadTexture(this.kLayer3);
	gEngine.Textures.loadTexture(this.kLayer4);
	gEngine.Textures.loadTexture(this.kLayer5);
	gEngine.Textures.loadTexture(this.kLayer6);
	gEngine.Textures.loadTexture(this.kLayer7);
	gEngine.Textures.loadTexture(this.kLayer8);
};

MyGameScene.prototype.unloadScene = function () {
	gEngine.Textures.unloadTexture(this.kLayer1);
	gEngine.Textures.unloadTexture(this.kLayer2);
	gEngine.Textures.unloadTexture(this.kLayer3);
	gEngine.Textures.unloadTexture(this.kLayer4);
	gEngine.Textures.unloadTexture(this.kLayer5);
	gEngine.Textures.unloadTexture(this.kLayer6);
	gEngine.Textures.unloadTexture(this.kLayer7);
	gEngine.Textures.unloadTexture(this.kLayer8);
};
Now we initialize.
MyGameScene.prototype.initialize  = function () {
	this.mCamera = new Camera(
		vec2.fromValues(50, 40),		// position of the camera
		100,				// width of camera
		[0, 0, 500, 400]			// viewport (orgX, orgY, width, height)
	);
	this.mCamera.setBackgroundColor([0.8, 0.8, 0.8, 1]);

	var bg = new LightRenderable(this.kLayer1);
	bg.getXform().setSize(200, 100);
	bg.getXform().setPosition(50, 40);
	bg.getXform().setZPos(0);
	this.mBgL1 = new ParallaxGameObject(bg, 1, this.mCamera);
	this.mBgL1.setCurrentFrontDir([-1, 0, 0]);
	this.mBgL1.setSpeed(0.06);

	bg = new LightRenderable(this.kLayer2);
	bg.getXform().setSize(200, 100);
	bg.getXform().setPosition(50, 40);
	bg.getXform().setZPos(0);
	this.mBgL2 = new ParallaxGameObject(bg, 1, this.mCamera);
	this.mBgL2.setCurrentFrontDir([-1, 0, 0]);
	this.mBgL2.setSpeed(0.06);

	bg = new LightRenderable(this.kLayer3);
	bg.getXform().setSize(200, 100);
	bg.getXform().setPosition(50, 40);
	bg.getXform().setZPos(0);
	this.mBgL3 = new ParallaxGameObject(bg, 3, this.mCamera);
	this.mBgL3.setCurrentFrontDir([-1, 0, 0]);
	this.mBgL3.setSpeed(0.06);

	bg = new LightRenderable(this.kLayer4);
	bg.getXform().setSize(200, 100);
	bg.getXform().setPosition(50, 40);
	bg.getXform().setZPos(0);
	this.mBgL4 = new ParallaxGameObject(bg, 4, this.mCamera);
	this.mBgL4.setCurrentFrontDir([-1, 0, 0]);
	this.mBgL4.setSpeed(0.06);

	bg = new LightRenderable(this.kLayer5);
	bg.getXform().setSize(200, 100);
	bg.getXform().setPosition(50, 40);
	bg.getXform().setZPos(0);
	this.mBgL5 = new ParallaxGameObject(bg, 5, this.mCamera);
	this.mBgL5.setCurrentFrontDir([-1, 0, 0]);
	this.mBgL5.setSpeed(0.06);

	bg = new LightRenderable(this.kLayer6);
	bg.getXform().setSize(200, 100);
	bg.getXform().setPosition(50, 40);
	bg.getXform().setZPos(0);
	this.mBgL6 = new ParallaxGameObject(bg, 6, this.mCamera);
	this.mBgL6.setCurrentFrontDir([-1, 0, 0]);
	this.mBgL6.setSpeed(0.06);

	bg = new LightRenderable(this.kLayer7);
	bg.getXform().setSize(175, 100);
	bg.getXform().setPosition(100, 40);
	bg.getXform().setZPos(0);
	this.mBgL7 = new ParallaxGameObject(bg, 7, this.mCamera);
	this.mBgL7.setCurrentFrontDir([-1, 0, 0]);
	this.mBgL7.setSpeed(0.06);

	bg = new LightRenderable(this.kLayer8);
	bg.getXform().setSize(200, 100);
	bg.getXform().setPosition(50, 40);
	bg.getXform().setZPos(0);
	this.mBgL8 = new ParallaxGameObject(bg, 8, this.mCamera);
	this.mBgL8.setCurrentFrontDir([-1, 0, 0]);

	gEngine.DefaultResources.setGlobalAmbientIntensity(3);
};
Now we draw and update. We draw the layers with furthest (and slowest) first. Calling update() on each layer handles the animation.
// This is the draw function, make sure to setup proper drawing environment, and more
// importantly, make sure to _NOT_ change any state.
MyGameScene.prototype.draw = function () {
	// Clear the screen
	gEngine.Core.clearCanvas([0.8, 0.8, 0.8, 1.0]);

	// Activate our camera
	this.mCamera.setupViewProjection();

	// Draw our backgrounds
	this.mBgL8.draw(this.mCamera);
	this.mBgL7.draw(this.mCamera);
	this.mBgL6.draw(this.mCamera);
	this.mBgL5.draw(this.mCamera);
	this.mBgL4.draw(this.mCamera);
	this.mBgL3.draw(this.mCamera);
	this.mBgL2.draw(this.mCamera);
	this.mBgL1.draw(this.mCamera);
};

// The Update function, updates the application state. Make sure to _NOT_ draw
// anything from this function!
MyGameScene.prototype.update = function () {
	this.mBgL1.update();
	this.mBgL2.update();
	this.mBgL3.update();
	this.mBgL4.update();
	this.mBgL5.update();
	this.mBgL6.update();
	this.mBgL7.update();
	this.mBgL8.update();
};
Camera Panning with Parallax
Scrolling layers with parallax gives a sense of depth but we can take this further by making the effect more interactive. If we remove the calls to setCurrentFrontDir() and setSpeed() for all of the layers in the initialize() function, the layers will not move. We can then have our parallax affect work with the movement of our GameObjects. We can pan the camera within the update() function. Using the camera object's panWith() function will move the camera with the GameObject. We pass in a "subject" GameObject for the camera to focus on and a tolerance. A tolerance of 0.9 will start the pan affect when the subject gets within 90% of the view bounds. The parallax affect will work as expected during the panning.
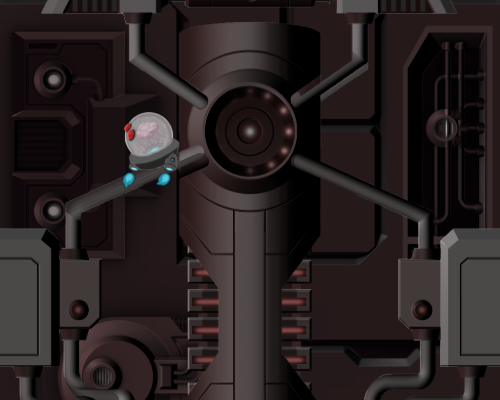
Use 'WASD' to move the minion. When the minion gets near the edges of the view, the camera will pan to follow the minion. The background will tile with parallax. See here for a live view.
In the sample , the panning call is found in the last lines of the update() function. We also use a directional light and completely disable the ambient light to enhance the images using normal maps for added depth. All other functionality has been covered in the tutorials and should be familiar. We show the full code below.
function MyGameScene() {
	this.mCamera = null;
	this.mLight = null;

	this.kTexture = "assets/minion_spritesheet.png"
	this.kBgTexture = "assets/bg.png"
	this.kBgTextureNormal = "assets/bg_normal.png"
	this.kBg2Texture = "assets/bgLayer.png"
	this.kBg2TextureNormal = "assets/bgLayer_normal.png"
}
gEngine.Core.inheritPrototype(MyGameScene, Scene);

MyGameScene.prototype.loadScene = function () {
	gEngine.Textures.loadTexture(this.kTexture);
	gEngine.Textures.loadTexture(this.kBgTexture);
	gEngine.Textures.loadTexture(this.kBgTextureNormal);
	gEngine.Textures.loadTexture(this.kBg2Texture);
	gEngine.Textures.loadTexture(this.kBg2TextureNormal);
};

MyGameScene.prototype.unloadScene = function () {
	gEngine.Textures.unloadTexture(this.kTexture);
	gEngine.Textures.unloadTexture(this.kBgTexture);
	gEngine.Textures.unloadTexture(this.kBgTextureNormal);
	gEngine.Textures.unloadTexture(this.kBg2Texture);
	gEngine.Textures.unloadTexture(this.kBg2TextureNormal);
};

MyGameScene.prototype.initialize = function () {
	this.mCamera = new Camera(
			vec2.fromValues(50, 40), // position of the camera
			100, 				// width of camera
			[0, 0, 500, 400]	// viewport (orgX, orgY, width, height)
			);
	this.mCamera.setBackgroundColor([0.8, 0.8, 0.8, 1]);

	// We use a directional light so the normals will give depth
	this.mLight = new Light();
	this.mLight.setLightType(Light.eLightType.eDirectionalLight);
	this.mLight.setColor([1.0, 1.0, 1.0, 1]);
	this.mLight.setDirection([0.3, 0, -1]);
	this.mLight.setIntensity(1);

	// we now use a sprite renderable object
	this.mRenderable = new LightRenderable(this.kTexture);
	this.mRenderable.setElementPixelPositions(130, 310, 0, 180);
	this.mRenderable.addLight(this.mLight);

	// create a new game object with the new renderable
	this.mGameObject = new GameObject(this.mRenderable);
	this.mGameObject.getXform().setSize(16, 16);
	this.mGameObject.getXform().setPosition(30, 50);

	var bg = new IllumRenderable(this.kBgTexture,this.kBgTextureNormal);
	bg.getXform().setSize(100, 100);
	bg.getXform().setPosition(50, 40);
	bg.getXform().setZPos(0);
	this.mBgL1 = new ParallaxGameObject(bg, 2, this.mCamera);
	bg.addLight(this.mLight);

	bg = new IllumRenderable(this.kBg2Texture,this.kBg2TextureNormal);
	bg.getXform().setSize(100, 100);
	bg.getXform().setPosition(50, 40);
	bg.getXform().setZPos(0);
	this.mBgL2 = new ParallaxGameObject(bg, 1, this.mCamera);
	bg.addLight(this.mLight);

	// We turn off the ambient light entirely
	gEngine.DefaultResources.setGlobalAmbientIntensity(0);
};

MyGameScene.prototype.draw = function () {
	// Clear the screen
	gEngine.Core.clearCanvas([0.8, 0.8, 0.8, 1.0]);

	// Activate our camera
	this.mCamera.setupViewProjection();

	// Draw our background objects
	this.mBgL1.draw(this.mCamera);
	this.mBgL2.draw(this.mCamera);

	// Draw out game object
	this.mGameObject.draw(this.mCamera);
};

MyGameScene.prototype.update = function () {
	// Update for the parallax affect to work
	this.mBgL1.update();
	this.mBgL2.update();

	// Use WASD keys to control the game object
	if (gEngine.Input.isKeyPressed(gEngine.Input.keys.A)) {
		this.mRenderable.setElementPixelPositions(130, 310, 0, 180);
		this.mGameObject.getXform().incXPosBy(-0.5);
	}

	if (gEngine.Input.isKeyPressed(gEngine.Input.keys.D)) {
		this.mRenderable.setElementPixelPositions(720, 900, 0, 180);
		this.mGameObject.getXform().incXPosBy(0.5);
	}

	if (gEngine.Input.isKeyPressed(gEngine.Input.keys.S)) {
		this.mGameObject.getXform().incYPosBy(-0.5);
	}

	if (gEngine.Input.isKeyPressed(gEngine.Input.keys.W)) {
		this.mGameObject.getXform().incYPosBy(0.5);
	}

	this.mGameObject.update();
	// Make the camera pan so the game object is always in view
	this.mCamera.panWith(this.mGameObject.getXform(), 0.9);
	this.mCamera.update();
};
Conclusion
Over the course of this tutorial, we have taken a peek at many aspects of the GTCS Game Engine. For a more in-depth look at the commands, be sure to reference the API documentation.
Tutorial 5 <-- Tutorial 6
Main tutorial guide page