GTCS Game Engine:
ParticleSystem Tutorial
Note: To use the ParticleSystem, you must have the newest version of the game engine.
Introduction
The ParticleSystem will allow to easily create and manipulate a permanent particle emitter of your choosing.
Currently, there are 3 Particle presets to choose from. Fire, Smoke, and Snow.
For this tutorial, we shall explain how to control the ParticleSystem using Fire as the example. Any differences between the 3 will be explained during this tutorial.
Here's an example of a basic fire.
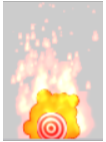
This flame is a basic fire that can be used in many scenarios. Now let’s go over how a flame such as this can be created.
Flame Exapmles: Torch Flame • Pillar Flame • Forest Flame
You can download the source code from here. Fire, Smoke, and Snow.
You can try the demo for the ParticleSystems here. Fire, Smoke, and Snow.
Structure of Fire class
MyGame.prototype.initialize = function(){
	this.mFire = Fire(xPos, yPos, width, height, life, xVelocity, yVelocity, flicker, intensity, xAcceleration, size, yOffset);
};
Let's look at what each of these parameters mean.
| xPos | The X Position that the object will be based on |
| yPos | The Y Position that the object will be based on |
| width(xOffset) | The maximum horizontal offset that particles can spawn from |
| yAcceleration | The vertical acceleration of the particles |
| life | The life of the particles that the emitter spawns |
| xVelocity | The maximum starting horizontal velocity for the particles |
| yVelocity | The maximum starting vertical velocity for the particles |
| flicker | How quickly the particles shrink |
| intensity | How many particles are created every update |
| xAcceleration | The horizontal acceleration of the particles |
| size | The starting size of the particles |
| yOffset | The maximum vertical offset that particles can spawn from |
There are getters and setters for all of these variables
A fire object creates a fire particle and modifies all these variables are used in creating the fire like effect that you desire.
MyGame.prototype.draw = function(aCamera){
	this.mFire.draw(aCamera);
};
By passing a Camera object to the draw method, the Fire object will be drawn on that camera at the location that it is set on.
MyGame.prototype.update = function(){
	gEngine.ParticleSystem.update(this.mFire);
	// ...continued on next part...
This will create and update the fire particles.
	this.mFire.processCollision(objSet);
};
By passing a object set, this will allow the particles to collide with objects in the passed set.
To make a basic fire, these are the parameters that are needed.
| Width | 3 |
| yAcceleration | 2 |
| Life | 20 |
| xVelocity | 0 |
| yVelocity | 20 |
| Flicker | 4 |
| Intensity | 1 |
| xAcceleration | 0 |
| Size | 2.5 |
| yOffset | 0 |
Now, let’s get into a bit more detail with these parameters.
Width(xOffset)
By increasing this parameter, you can increase the width of the fire. As you increase the width, you will also need to increase the intensity of the fire to compensate.
Acceleration
yAcceleration increases the speed that the fire particles raise up into the air. Thus, it’s very useful in creating the appearance of very powerful flames. Controlling the height while increasing the speed will require you to lower the life of the particles. This however comes with the loss of the natural fading of the particles. This also applies for xAcceleration.
Life
Useful for giving bigger fire particles more time to naturally fade, or for controlling the size of more intense fires.
Velocity
The velocity variables are useful for creating unusual fires. Take this image for example.p>
The flame particles will initially move away from base of the fire. If it spawns to the right of it, it will move right. The reverse applies if it spawns to the left. The higher you make the value, the farther the particles will be pushed from the base.
yVelocity will cause particles to shoot up faster initially. Since this is the maximum velocity that a particle can have, it creates the effect that particles in the foreground shoot up much faster than those in the background.
The acceleration will overpower the velocity if the difference between them is big enough.
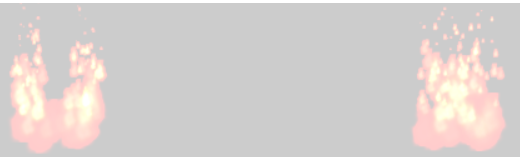
Flicker
By increasing this parameter, particles will shrink faster. which means that particles have less of that white center to them. The fire itself will also appear to be shorter due to the particles shrinking faster. The fire to the right is an example of this.
If the value is 0, then particles don’t shrink during their lifespan. If the flicker is negative, then particles grow in size rather than shrink. If the value is too high the entire screen goes white due to the eventual size of the particle.
Intensity
This is the number of fire particles that are created every update cycle. As you increase this parameter the fire becomes denser with particles and thus whiter.

This particle is also very important to increasing the width and height of the fires. Increasing the offset merely increase the horizontal/vertical range where particles can spawn. Without an increase in intensity as well, you lose the fire effect and will instead just look like a bunch of particles spawning at random points.

Size
Increasing the particle’s size will also cause the base of the flame to be bigger and will make the red part of the flame’s base more apparent.

yOffset
This is similar to xOffset but instead is for vertical range. There is a difference in how the vertical offset is calculated per particle. Rather than using a base number, it just takes a random percentage of the yOffset and makes that the vertical offset of that particle. Because of that, the higher the value is, the less consistent the base of the fire becomes.

To compensate for this, you can use an object to hide the base, or lower the yPos of the Fire Object for more desirable positioning.
Now let’s look at 3 other types of fires to gain a better understanding of how these parameters interact with each other.
Torch Fire

| Width | 0 |
| yAcceleration | 0 |
| Life | 20 |
| xVelocity | 0 |
| yVelocity | 20 |
| Flicker | 32 |
| Intensity | 1 |
| xAcceleration | 0 |
| Size | 2.5 |
| yOffset | 0 |
By shrinking the width and yAcceleration parameters, you get a thin, slower burning fire. The increase of the flicker parameter is what causes it to shrink to such a degree. Its reduction reduces both the width and height of the fire by about half, and the fire also is far less intense due to how quickly it shrinks.
Pillar Fire

| Width | 3 |
| yAcceleration | 36 |
| Life | 8 |
| xVelocity | 0 |
| yVelocity | 0 |
| Flicker | 2 |
| Intensity | 15 |
| xAcceleration | 0 |
| Size | 2.5 |
| yOffset | 1 |
The 2 most impactful parameters are the yAcceleration and the intensity. To achieve that blazing, solid white fire effect, you need the particles to rise very fast, and you need lots of particles to spawn at once. The flicker parameter is set to 2 to make it shrink very slowly, while still keeping the fire like effect where it is shrinking.
Forest Fire

| Width | 23 |
| yAcceleration | 11 |
| Life | 20 |
| xVelocity | 0 |
| yVelocity | 12 |
| Flicker | 4 |
| Intensity | 23 |
| xAcceleration | 8 |
| Size | 3.5 |
| yOffset | 0 |
This requires raising both the width and intensity parameter to have a consistently wider fire. To have a “blowing in the wind” effect to the fire, you would raise both x and y acceleration until you reach the wind speed that you desire.
Now that the how for using and controlling the ParticleSystem has been explained. Let's look at the the other 2 ParticleSystem briefly.
Smoke
This ParticleSystem preset has no differences to fire beside a different particle at the helm.
Here's a simple example of how smoke can be used.

| Width | 3 |
| yAcceleration | 2 |
| Life | 60 |
| xVelocity | 0 |
| yVelocity | 20 |
| Flicker | 1 |
| Intensity | 1 |
| xAcceleration | 0 |
| Size | 2.5 |
| yOffset | 0 |
By reducing the flicker and raising the life of the smoke, the particles last longer and give that effect of smoke rising from the source.
Snow
All y variables are flipped. So when you increase the value, it causes it to go down quicker rather than up.
Here's the variables for normal snow.

| Width | 50 |
| yAcceleration | 5 |
| Life | 200 |
| xVelocity | 0 |
| yVelocity | 0 |
| Flicker | 0 |
| Intensity | 1 |
| xAcceleration | 0 |
| Size | 0.5 |
| yOffset | 0 |
The most important variable is life as to have falling particles that don't disappear en mass randomly, the particles need to have a long life. Flicker is set to 0 since in this example the particles don't need to shrink. yAcceleration controls how fast the snow falls and Width can be changed depending on how wide the snow should fall.
Conclusion
This particle system will allow for the creation of fire, smoke, and snow for the usage in games. With the knowledge you gained from this tutorial, you’re now capable of finding further applications for the ParticleSystem.