GTCS Game Engine:
ParticleSystem Tutorial
Note: To use the ParticleSystem, you must have the newest version of the game engine.
Introduction
The ParticleSystem will allow to easily create and manipulate a permanent particle emitter of your choosing.
Currently, there are 5 Particle presets to choose from. Fire, Smoke, Snow, Dust, and SubEmitters.
This tutorial will explain how to control the stock ParticleSystem, with specific details for different presets.
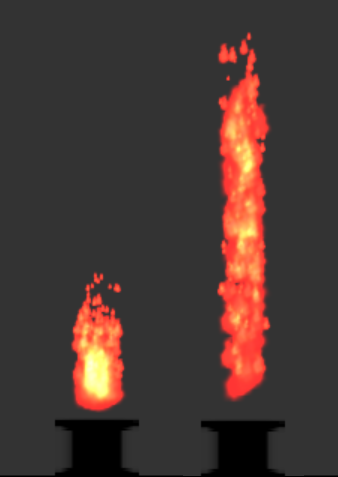
Flame Examples: Torch • Pillar • Volcano
You can try the demo for the ParticleSystems here.
Structure of Fire class
The preset particle systems use corresponding struct holding the values the particle system will be instantiated with. If no values are specified in the parameter struct, the system will be instantiated with default values. Default struct values can be changed in the system specific files, where the struct constructors are located.
MyGame.prototype.initialize = function(){
        var fireParams = new FireParams(xPos, yPos, width, height, life, xVelocity, yVelocity, flicker, intensity, xAcceleration, size, yOffset, emberSelection, taperSelection);
	this.mFire = Fire(fireParams);
};
MyGame.prototype.initialize = function(){
        var fireParams = new FireParams();
	this.mFire = Fire(fireParams);
};
Let's look at what each of these parameters mean.
| xPos | The X Position that the object will be based on |
| yPos | The Y Position that the object will be based on |
| width(xOffset) | The maximum horizontal offset that particles can spawn from |
| yAcceleration | The vertical acceleration of the particles |
| life | The life of the particles that the emitter spawns |
| xVelocity | The maximum starting horizontal velocity for the particles |
| yVelocity | The maximum starting vertical velocity for the particles |
| flicker | How quickly the particles shrink |
| intensity | How many particles are created every update |
| xAcceleration | The horizontal acceleration of the particles |
| size | The starting size of the particles |
| yOffset | The maximum vertical offset that particles can spawn from |
| EmberSelection | The percentage of particles that will have the ember effect applied to them |
| TaperSelection | The percentage of particles that will have the taper effect applied to them |
There are getters and setters for all of these variables
A fire object creates a fire particle modified with all these variables used in creating the fire-like effect that you desire.
MyGame.prototype.draw = function(aCamera){
	this.mFire.draw(aCamera);
};
By passing a Camera object to the draw method, the Fire object will be drawn on that camera at the location that it is set on.
MyGame.prototype.update = function(){
	gEngine.ParticleSystem.update(this.mFire);
	// ...continued on next part...
This will create and update the fire particles.
	this.mFire.processCollision(objSet);
};
By passing a object set, this will allow the particles to collide with objects in the passed set.
To make a basic fire, these are the parameters that are needed.
| Width | 3 |
| yAcceleration | 2 |
| Life | 20 |
| xVelocity | 0 |
| yVelocity | 20 |
| Flicker | 3 |
| Intensity | 6 |
| xAcceleration | 0 |
| Size | 3.5 |
| yOffset | 0 |
| emberSelection | 10 |
| taperSelection | 0 |
Now, let’s get into a bit more detail with these parameters.
Width(xOffset)
How far from the system position particles can be spawned. By increasing this parameter, you can increase the width of the fire. As you increase the width, you will also need to increase the intensity of the fire to compensate.
Acceleration
Values governing particle acceleration in X and Y directions. yAcceleration increases the speed that the fire particles raise up into the air. Thus, it’s very useful in creating the appearance of very powerful flames. Controlling the height while increasing the speed will require you to lower the life of the particles. This however comes with the loss of the natural fading of the particles. This also applies to xAcceleration.
Life
How long the particles will exist. Useful for giving bigger fire particles more time to naturally fade, or for controlling the size of more intense fires. It is prudent to minimize particle life to ensure maximum frame rates.
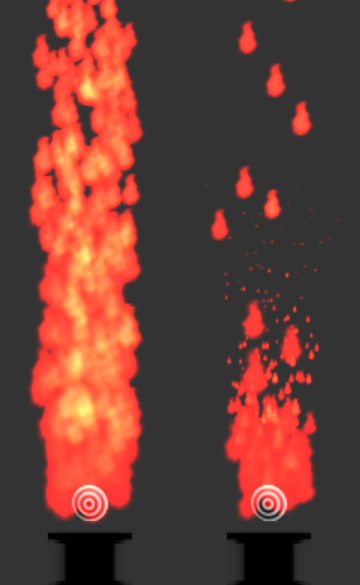
Velocity
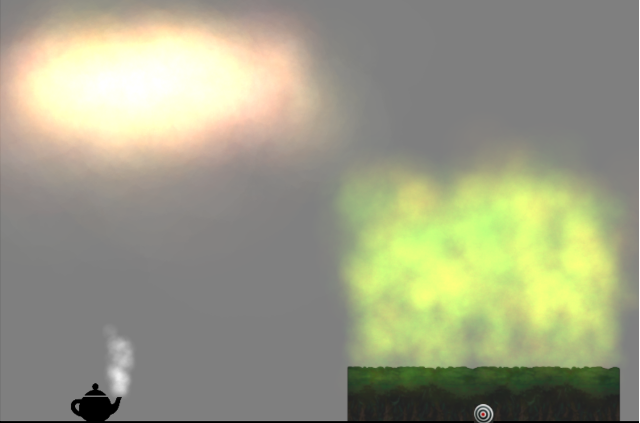
Values governing particle speeds in the X and Y directions. The velocity variables are useful for creating unusual fires. Take this image for example.
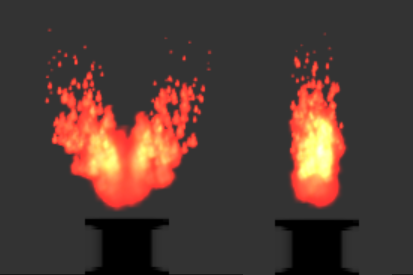
The flame particles will initially move away from base of the fire. If it spawns to the right of it, it will move right. The reverse applies if it spawns to the left. The higher you make the value, the farther the particles will be pushed from the base.
yVelocity will cause particles to shoot up faster initially. Since this is the maximum velocity that a particle can have, it creates the effect that particles in the foreground shoot up much faster than those in the background.
Acceleration will overpower the velocity if the difference between them is big enough.
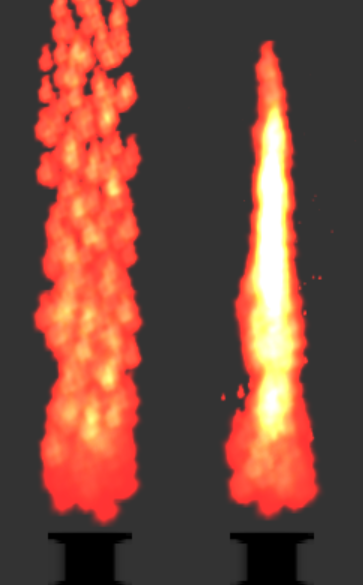
Flicker
By increasing this parameter, particles will shrink faster. which means that particles have less of that white center to them. The fire itself will also appear to be shorter due to the particles shrinking faster. The fire to the right is an example of this.
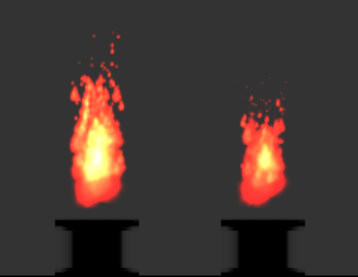
If the value is 0, then particles don’t shrink during their lifespan. If the flicker is negative, then particles grow in size rather than shrink. If the value is too high the entire screen goes white due to the eventual size of the particle.
Intensity
The number of particles created every update cycle. As you increase this parameter the fire becomes denser with particles and thus whiter. It is also prudent to minimize this value to ensure maximum frame rates.

This parameter is also very important when increasing the width and height of the fires. Increasing the offset merely increase the horizontal/vertical range where particles can spawn. Without an increase in intensity as well, you lose the fire effect and will instead just look like a bunch of particles spawning at random points.
Size
Increasing the particle’s size will also cause the base of the flame to be bigger and will make the red part of the flame’s base more apparent.

yOffset
This is similar to xOffset but instead is for the vertical range. There is a difference in how the vertical offset is calculated per particle. Rather than using a base number, it just takes a random percentage of the yOffset and makes that the vertical offset of that particle. Because of that, the higher the value is, the less consistent the base of the system becomes.
To compensate for this, you can use an object to hide the base, or lower the yPos of the Fire Object for more desirable positioning.
EmberSelection
This controls what percentage of created particles will exhibit the ember effect. These particles will become much smaller faster than the normal and exhibit a swirling, ember-like behavior.
TaperSelection
This controls what percentage of created particles will exhibit the taper effect. These particles will generally move to the center position of the fire system, creating a more realistic flame like effect.
Ember selection overrides taper selection, that is if ember selection is 75, and taper selection is > 25, only 25% of the particles will be tapered.
Now let’s look at 3 other types of fires to gain a better understanding of how these parameters interact with each other.
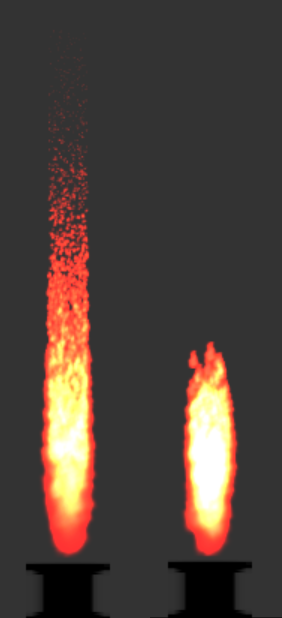
Torch Fire

| Width | 0 |
| yAcceleration | 0 |
| Life | 20 |
| xVelocity | 0 |
| yVelocity | 20 |
| Flicker | 32 |
| Intensity | 1 |
| xAcceleration | 0 |
| Size | 2.5 |
| yOffset | 0 |
| emberSelection | 0 |
| taperSelection | 100 |
By shrinking the width and yAcceleration parameters, you get a thin, slower burning fire. The increase of the flicker parameter is what causes it to shrink to such a degree. Its reduction reduces both the width and height of the fire by about half, and the fire also is far less intense due to how quickly it shrinks. Torches and candles typically do not emit embers so we zero out the emberSelection value and raise the taperSelection value to 100% to get a tightly forming flame.
Pillar Fire

| Width | 3 |
| yAcceleration | 36 |
| Life | 8 |
| xVelocity | 0 |
| yVelocity | 0 |
| Flicker | 2 |
| Intensity | 15 |
| xAcceleration | 0 |
| Size | 2.5 |
| yOffset | 1 |
| emberSelection | 5 |
| taperSelection | 95 |
The 2 most impactful parameters are the yAcceleration and the intensity. To achieve that blazing, solid white fire effect, you need the particles to rise very fast, and you need lots of particles to spawn at once. The flicker parameter is set to 2 to make it shrink very slowly, while still keeping the fire like effect where it is shrinking. We set the taper selection value to 95% and ember selection to 5% to maintain clearly formed flames.
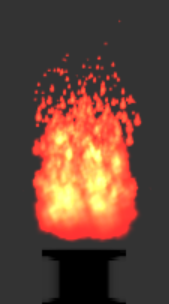
Volcano Fire
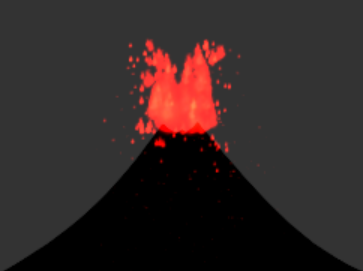
| Width | 1 |
| yAcceleration | -20 |
| Life | 13 |
| xVelocity | 20 |
| yVelocity | 50 |
| Flicker | 1 |
| Intensity | 8 |
| xAcceleration | 0 |
| Size | 0.5 |
| yOffset | 0 |
| emberSelection | 100 |
| taperSelection | 0 |
To create the spewing volcano effect we set the yAcceleration to a reasonable negative value while setting the initial yVelocity to a positive value more than double. With a width of 1, we can set the xVelocity high enough to get the particles to shoot away from the emitter base in both directions. Maximizing the emberSelection value causes each particle to exhibit the swirling behavior and quickly diminishes their size.
Smoke
MyGame.prototype.initialize = function(){
	this.mSmoke = Smoke(xPos, yPos, width, yAcceleration, life, xVelocity, yVelocity, flicker, intensity, xAcceleration, size, yOffset, rVal, gVal, bVal, aVal, colorShift);
};
This ParticleSystem preset has no differences to fire beside a different particle at the helm, with the exception of the colorizing parameters.
Here's some example of how smoke can be used.
| Width | 20 |
| yAcceleration | 2 |
| Life | 60 |
| xVelocity | 0 |
| yVelocity | 5 |
| Flicker | 1 |
| Intensity | 9 |
| xAcceleration | 0 |
| Size | 2.5 |
| yOffset | 7 |
| rVal | 0.1 |
| gVal | 0.2 |
| bVal | 0.1 |
| aVal | 0 |
| colorShift | 0.09 |
By reducing the flicker and raising the life of the smoke, the particles last longer and give that effect of smoke rising from the source. The colorShift parameter creates a multi-color effect, good for simulating depth and light diffraction.
Snow
MyGame.prototype.initialize = function(){
	this.mSnow = Snow(xPos, yPos, width, yAcceleration, life, xVelocity, yVelocity, flicker, intensity, xAcceleration, size, yOffset);
};
All y variables are flipped. So when you increase the value, it causes it to go down quicker rather than up.
Here's the variables for normal snow.
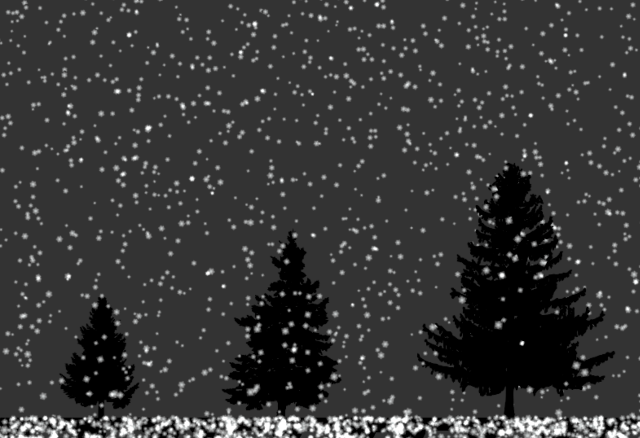
| Width | 50 |
| yAcceleration | 5 |
| Life | 150 |
| xVelocity | 0 |
| yVelocity | 0 |
| Flicker | 0 |
| Intensity | 3 |
| xAcceleration | 0 |
| Size | -0.5 |
| yOffset | 0 |
The most important variable is life as to have falling particles that don't disappear en mass randomly, the particles need to have a long life. This system in particular wraps the particles from one edge of the screen to the other so you can apply this effect to an entire scene and adjust the horizontal velocity to mimic a gusty storm. The snow system handles particle size adjustment making some smaller over time and some larger over time. Snow particles are assigned z-values 1, 3, or 5 depending on their spin, which can be useful to create layered scenes with some snow falling behind or in front of certain game-objects depending on their z-position. Remember to alter your game object's z-position if you wish to create this effect. Also note the particle behavior change when they hit the platform level. This is done by accessing the system's particle set with the getSet() method (a member of all particle systems). If you wish to alter the height at which the particles alter their behavior, please examine the Snow.js code for more details.
Dust
MyGame.prototype.initialize = function(){
	this.mDust = Dust(xPos, yPos, width, yAcceleration, life, xVelocity, yVelocity, flicker, intensity, xAcceleration, size, yOffset);
};
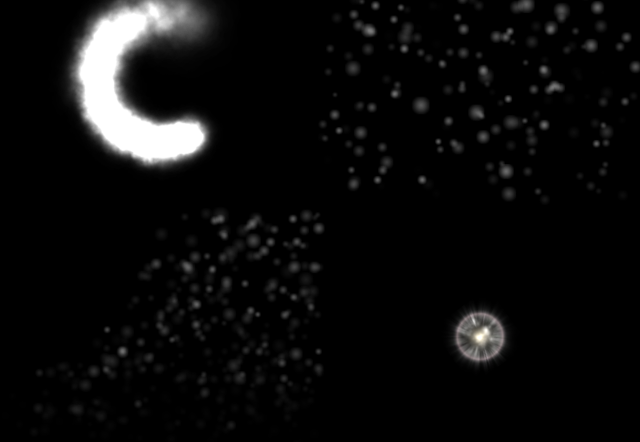
The dust system functions much like the stock system, with 2 notable exceptions. Particles from this system fade in from no tinting to create the illusion of depth and there is a slight random velocity applied to all to enhance their drift. The system example in the top right mimics dust motes floating in front of a camera for a cinematic feel. This example has an intensity of 1, but for a cleaner look, you could modify the createParticle() function in the system to operate like a SubEmitter system, with less than 1 particle being generated every update. The bottom left example could be used to show dandelion or cotton blossoms rising gently from a breezy field.
The other examples cannot be created using the constant emitter system and must be programmed in the scene. The top left effect is created by creating a dust particle on every update at the location of a target object. This could be used if you have an object that kicks up dust as it moves. The bottom right could be used to demonstrate an impact effect of an object falling or exploding (depending on perspective). The effect is created by creating three differently textured particles at the same time at the same spot and tuning each with different size deltas and life values. Please examine the DustDemo.js code for greater detail about these effects.
Here's the variables for dust.
| Width | 50 |
| yAcceleration | -.05 |
| Life | 100 |
| xVelocity | 0 |
| yVelocity | 0 |
| Flicker | 1 |
| Intensity | 1 |
| xAcceleration | 0 |
| Size | 1 |
| yOffset | 40 |
SubEmitter
MyGame.prototype.initialize = function(){
	this.mSFX = SubEmitter(MainParticleTexture, SubParticleTexture, xPos, yPos, width, yAcceleration, life, xVelocity, yVelocity, flicker, intensity, xAcceleration, size, yOffset, startColor, finalColor, subStartColor, subFinalColor, physInherit, subParticleLife, subParticleSizeDelta);
};
The SubEmitter class creates an effect by creating a new particle when a particle from the main emitter has died. The life and size delta of the new particle can be specified in the system constructor as well as whether or not the subparticle inherits the velocity and acceleration from the main particle. Turning off the physical inheritance is useful for creating explosive effects, but you may want to have the subparticle keep the physics of the main particle for projectile like effects. You can also specify desired colors for both the main and sub particles.
Here's the variables for the firework subemitter.
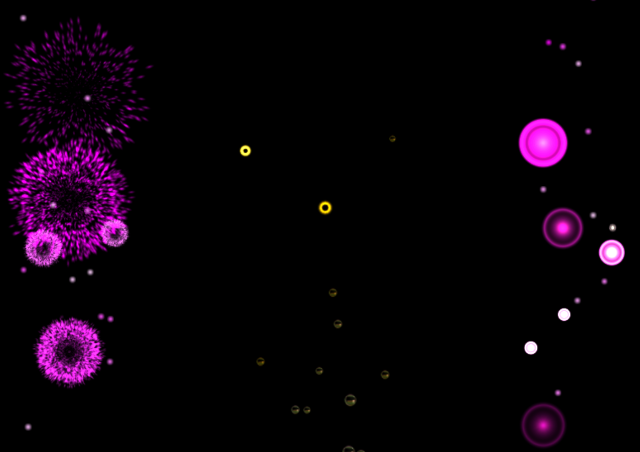
| Width | 0 |
| yAcceleration | -5 |
| Life | 15 |
| xVelocity | 50 |
| yVelocity | 275 |
| Flicker | 0 |
| Intensity | 55 |
| xAcceleration | 0 |
| Size | .1 |
| yOffset | 0 |
| startColor | [1,1,1,1] |
| finalColor | [1,0,1,1] |
| subStartColor | [1,1,1,1] |
| subFinalColor | [1,0,1,1] |
| physInherit | false |
| subParticleLife | 30 |
| subParticleSizeDelta | 1.1 |
Note: Click (or hold the mouse button at your own risk) in the viewport of this demo for scene based subemitter effect. Please examine the SFXDemo.js code for more details about this effect.
Conclusion
The particle system will allow for the creation of fire, smoke, dust, snow, fireworks, or any other effects you can think of for your game scenes. With the knowledge gained from this tutorial, you’re now capable of finding further applications for the ParticleSystem.